

How To Crop Off A Face In Picture And Add Another One Gimp
Gimp Quickies
Intention
Then you lot installed GIMP on your reckoner, congratulations! GIMP is a very powerful paradigm manipulation software, only don't let that intimidate you. Even if y'all don't have time to larn advanced computer graphics, GIMP can yet be a very useful and handy tool for quick image modifications.
It is my promise that these few examples will help to solve those small, quick modifications that you may demand to utilise to an image. Hopefully this will lead to learning fifty-fifty more powerful image editing capabilities that GIMP is capable of as well.
For quick access, these are the four main points I'll cover in this quick tutorial:
- Changing the Size (Dimensions) of an Image (Scale)
- Changing the Size (Filesize) of a JPEG
- Crop an Paradigm
- Rotate or Flip an Image
In keeping with the spirit of the predecessor to this page, I volition exist using images from the Astronomy Picture of the Day (APOD), provided past NASA.
All you need to know to follow these quick examples is to be able to discover your prototype and open information technology:
Irresolute the Size (Dimensions) of an Image (Calibration)
Information technology's a common problem that you may have an image that is besides large for a particular purpose (embedding in a webpage, posting somewhere online, or including in an e-mail for instance). In this case y'all volition often desire to calibration the image down to a smaller size more suitable for your use.
This is a very unproblematic task to reach in GIMP easily.
The paradigm nosotros'll be using to illustrate this with is The Horsehead Nebula in Infrared.
When you offset open your image in GIMP, chances are that the image will be zoomed and so that the entire image fits in your canvas. The thing to notice for this example is that past default the window decoration at the top of GIMP will show you lot some information about the image.
Notice that the data at the summit of the window shows the current pixel dimensions of the epitome (in this case, the pixel size is 1225×1280).
To resize the image to new dimensions, we demand only invoke the Scale Paradigm dialog:
This will and then open up the Scale Image dialog:
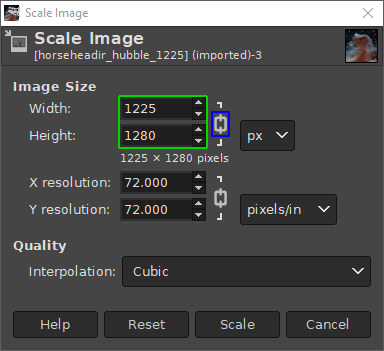
In the Scale Image dialog, you'll find a place to enter new values for Width and Height. If you know one of the new dimensions yous'd similar for the image, fill in the appropriate ane here.
You'll as well observe a small chain but to the right of the Width and Height entry boxes. This icon shows that the Width and Peak values are locked with respect to each other, meaning that changing 1 value will crusade the other to alter in order to keep the same attribute ratio (no strange compression or stretching in the image).
For example, if you knew that you wanted your image to take a new width of 600px, you lot tin enter that value in the Width input, and the Height volition automatically alter to maintain the aspect ratio of the paradigm:
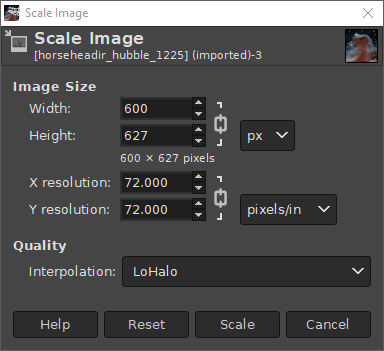
As you lot tin can encounter, entering 600px for the width automatically changes the height to 627px.
Also notice I take shown a unlike option under Quality → Interpolation. The default value for this is Cubic, but to retain the best quality it would better to use Sinc (Lanczos3).
If you want to specify a new size using a different type of value (other than Pixel size), y'all can change the blazon by clicking on the "px" spinner:
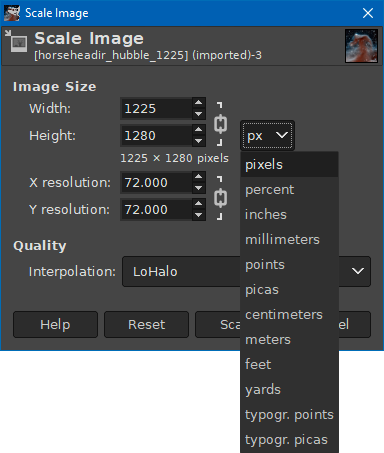
A common use for this could be if y'all wanted to specify a new size every bit a percentage of the old one. In this case you lot could alter to "pct", and so enter 50 in either field to scale the epitome in one-half.
Once you are washed scaling the image, don't forget to consign the changes you've made:
to export every bit a new filename, or:
to overwrite the original file (employ circumspection).
For more detail almost using Scale Epitome, yous tin run into the documentation.
Changing the Size (Filesize) of a JPEG
You can too alter the filesize of an image when exporting it to a format similar JPEG. JPEG is a lossy compression algorithm, meaning that when saving images to the JPEG format, you lot volition cede some image quality to gain a smaller filesize.
Using the same Horsehead Nebula prototype from above, I have resized it to 200px wide (come across above), and exported it using dissimilar levels of JPEG pinch:
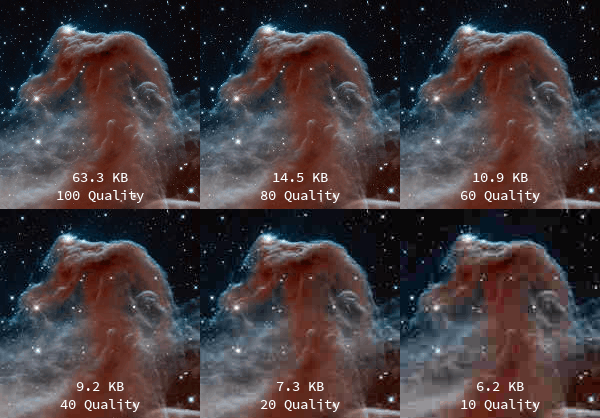
As y'all can come across, fifty-fifty at a quality setting of eighty, the prototype is significantly smaller in filesize (77% size reduction), while the prototype quality is still quite reasonable.
When you've finished any prototype modifications you lot are doing, and are ready to export, but invoke the export dialog with:
This will invoke the Export Image dialog:
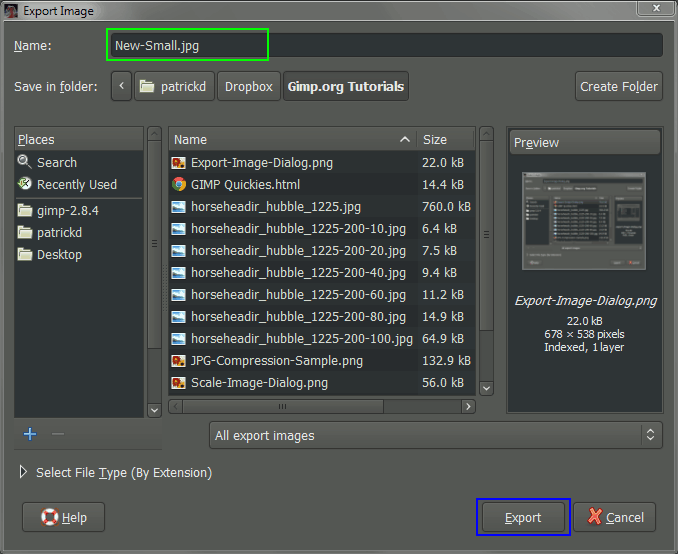
You can at present enter a new proper name for your file hither. If you lot include the filetype extension (in this instance, .jpg), GIMP will automatically try to consign in that file format for you. Hither I am exporting the prototype every bit a JPEG file.
You can also navigate to a new location on your reckoner through the Places pane, if yous demand to export the file to a different location. When yous are ready to export the image, just hit the Export button.
This will and then bring upwardly the Export Image as JPEG dialog, where you can modify the quality of the consign:
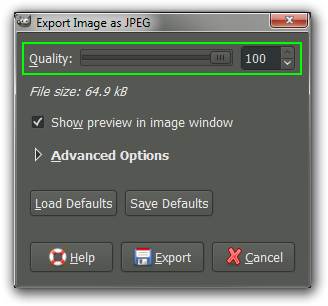
From this dialog you can now change the quality of the export. If you also have the "Show preview in paradigm window" pick checked, the paradigm on the sheet will update to reflect the quality value you input. This will too enable the "File size:" information to tell you what the resulting file size will be. (Yous may need to motility some windows around to view the preview on the sail in the background).
When you are happy with the results, hitting the Export button to export.
To encounter more details nigh exporting different image formats, see Getting Images out of GIMP in the manual.
Crop an Image
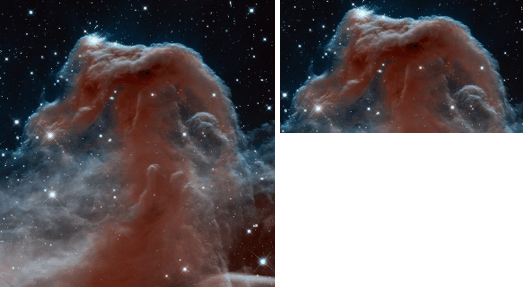
In that location are numerous reasons yous may desire to crop an image. You may want to remove useless borders or data for aesthetic reasons, or you may want the focus of the final epitome to be of some particular item for instance.
In a nutshell, cropping is just an performance to trim the image down to a smaller region than what you started with:
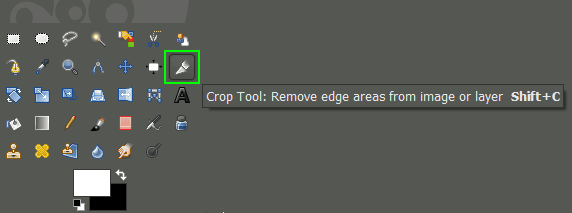
The procedure to crop an image is straightforward. You can either get to the Ingather Tool through the tools palette:
Or you can access the ingather tool through the menus:
 Once the tool is activated, you'll detect that your mouse cursor on the canvas will change to betoken the Crop Tool is being used.
Now you tin Left-Click anywhere on your epitome sail, and drag the mouse to a new location to highlight an initial pick to crop. You don't have to worry about being exact at this point, every bit you will be able to modify the terminal selection before actually cropping.
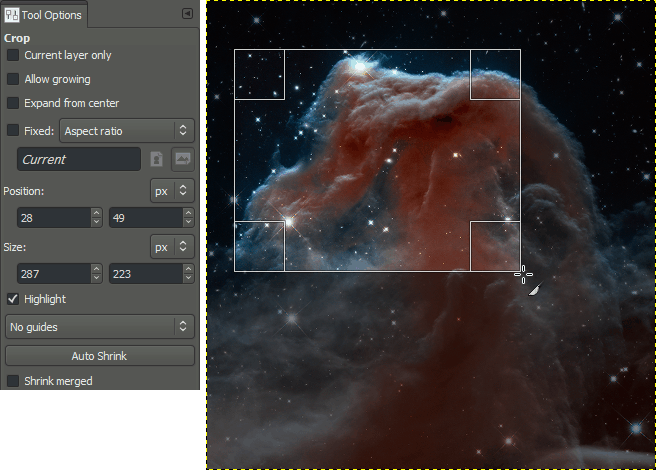
Later making the initial pick of a region to crop, you'll find the selection withal active. At this point hovering your mouse cursor over any of the 4 corners or sides of the selection will change the mouse cursor, and highlight that region.
This allows yous to at present fine-tune the selection for cropping. You can click and drag any side or corner to move that portion of the selection.
Once you are happy with the region to crop, you tin just printing the "Enter" primal on your keyboard to commit the ingather. If at any time you'd like to start over or decide non to crop at all, y'all tin press the "Esc" key on your keyboard to back out of the operation.
See the documentation for more information on cropping in GIMP.
Another Method
Another style to crop an image is to make a choice showtime, using the Rectangle Select Tool:
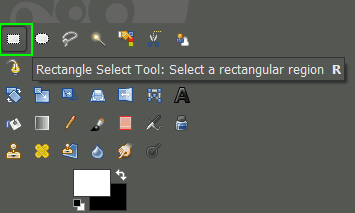
Or through the menus:
Y'all can so highlight a selection the same fashion as the Ingather Tool, and adjust the option every bit well. In one case you have a selection you like, you can ingather the paradigm to fit that selection through:
Rotate and/or Flip an Paradigm
In that location may be a time that you would need to rotate an image. For instance, y'all may have taken the image with your camera in a vertical orientation, and for some reason information technology wasn't detected past GIMP every bit needing to be rotated (GIMP volition normally figure this out for you, but not ever).
There may also be a time that you'd like to flip an image as well. These commands are grouped together nether the aforementioned menu detail:
Flip an Epitome
If you desire to flip your image, the Transform carte offers two options, Flip Horizontally, or Flip Vertically. This performance will mirror your image along the specified axis. For instance, hither are all of the flip operations shown in a single image:
Rotate an Image
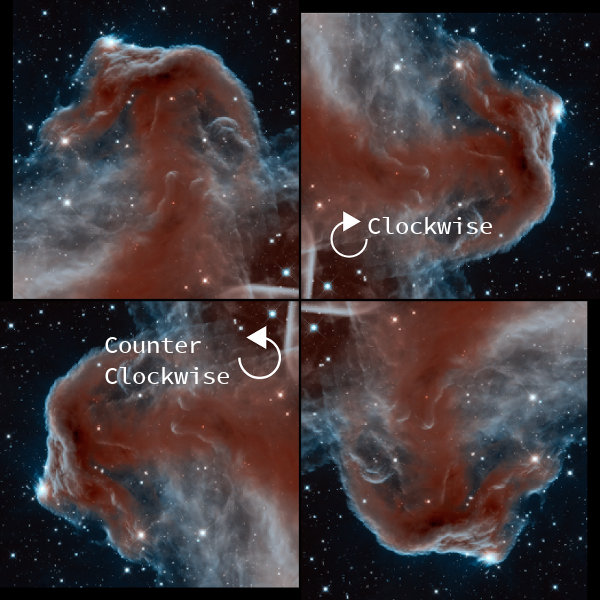
Image rotation from the Transform card is contrained to either 90° clockwise/counter-clockwise, or 180°.
Don't mis-interpret this to mean that GIMP cannot do arbitrary rotations (any angle). Capricious rotations are handled on a per-layer basis, while the image rotation described here is applicable to the entire paradigm at in one case.
In Determination
The simple examples shown here are just the tip of a really, really large iceberg. These are, however, common modifications that many people are frequently looking to make without having to learn too much about paradigm processing. Hopefully they accept been helpful.
I encourage you to peruse the other tutorials for more advanced methods of image processing equally well!
The original tutorial this was adapted from can be found hither.
 GIMP Tutorial - GIMP Quickies (text & images) by Pat David is licensed under a Creative Commons Attribution-ShareAlike iii.0 Unported License.

How To Crop Off A Face In Picture And Add Another One Gimp,
Source: https://www.gimp.org/tutorials/GIMP_Quickies/
Posted by: carterdianow.blogspot.com
0 Response to "How To Crop Off A Face In Picture And Add Another One Gimp"
Post a Comment